The Badgerodon Stack
The Badgerodon Stack is a simple, cross-platform, open-source, pull-based deployment system for web applications.
Overview
A typical web applications is made up of several components:
- The frontend code written in HTML, CSS and Javascript and run in the user's browser
- The web application that handles HTTP requests and serves the frontend code
- A backend database where data is stored
- A reverse proxy or load balancer which sits in front of the web application (or hosts it via fastcgi or mod_* in apache)
- And other various service applications (email, queues, workers, ...) which may themselves be restful HTTP servers, or implement some other RPC mechanism (thrift, protobuf, ...)
In general web developers focus on the frontend and web application code (with some SQL thrown in for good measure). Configuring services, standing up machines, monitoring performance and downtime and deploying new releases are all activities which they'd rather not spend a lot of time focusing on. In larger companies there is usually an Operations team which can manage a lot of these tasks. But an Operations team is not always available. So how can a web developer perform these activities without it becoming a huge burden?
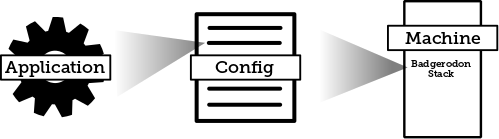
The Badgerodon Stack is designed to solve 3 of these problems: It handles the configuration of applications via environmental variables or config files, it handles the lifecycle of applications and which machines they run on and it also handles deployment.
More of a methodology than an application, the Badgerodon Stack involves several concepts:
- Stack
- The collection of software needed to run a complete web application. For example: the LAMP stack (linux, apache, mysql, php).
- Application
- An executable program. Applications have a binary
(
/bin/ls), zero or more options when executed (/bin/ls -a /some/directory) and a set of environmental variables (PATH=/home/user/bin). Applications are called services if they are meant to run continuosly. - Archive
- A
.tar.gzor.zipfile which contains an application and any other files it needs to run. The Badgerodon Stack extracts the contents of this archive and executes the application according to the machine config file. - Machine Config File
- A description of all the applications a machine should run: where those applications come from, the binary path and options used to start the application, a set of environmental variables to pass to the application and possibly symlink definitions or even directly embedded config files.
Usage
Usage is straightforward. First create a config file which describes all the applications you would like to run on the machine:
applications:
- name: example
  source: s3://example-bucket/stack/releases/example/v123.tar.gz
  service:
    command: [bin/example some argument]
    environment:
      MY_VAR: "some value"
Next run the stack application with options that direct it to watch this config file and react accordingly whenever it is changed:
stack watch s3://example-bucket/stack/machine-1.yaml
All of the applications will be downloaded, extracted and services will be created and started (according to the service mechanism available on the machine: systemd, upstart, etc...). If the config file changes applications will be updated so that they are brought into alignment with the config file.
This is why the Badgerodon Stack is a pull-based deployment system. To release
a new version of your application, build and bundle it as a new archive
(example/v124.tar.gz) and then update the config file.
Walkthrough
Perhaps the best way to understand the Badgerodon Stack is to see it in action. So lets build a simple web application: a link shortening service. Our service will consist of 2 applications:
- A python application built on top of flask which will handle 2 HTTP endpoints: one to generate links and another to follow them
- A Redis database which will store the links
We will deploy these 2 applications on a single linux machine. (I will be using a virtual machine with virtual box, but a cloud vm or nitrous.io box would work just as well)
The Python Application
We will start by creating a simple python script in
stack-example/links/links.py:
import os
import redis
import uuid
from flask import Flask, redirect, request

# get config from the environment
redis_hostname = os.getenv("REDIS_HOSTNAME", "localhost")
port = int(os.getenv("PORT", "5000"))

# connect to redis
r = redis.StrictRedis(host=redis_hostname, port=6379, db=0)

# create our app
app = Flask(__name__)

# post to /links to create a link
@app.route("/links", methods=["POST"])
def put_link():
    if "url" in request.form:
        link_id = str(uuid.uuid4())
        r.set(link_id, request.form["url"])
        return link_id
    else:
        return "Expected URL", 400

# get /links/<link_id> to redirect to the saved url
@app.route("/links/<link_id>")
def links(link_id):
    url = r.get(link_id)
    if url:
        return redirect(url)
    else:
        return "Link Not Found", 404

# run the app
if __name__ == "__main__":
    app.debug = True
    app.run(port=port)
This simple app depends on python and two libraries: redis and
flask. For development we can just install python (via
apt-get or similar), and then use pip to install the
libraries. But this setup won't work for the Badgerodon Stack because the
eventual server we plan to run the application on doesn't have these
installed.
So we have to bundle our application so it has no dependencies. Typically we would use a build server to do this (like Jenkins), which would also free us to use whatever operating system we wanted for local development. We would commit our code to Github (or similar) and Jenkins would listen for changes to the repository. It knows how to pull down the code and build the project accordingly. (This is known as continuous integration)
But for this example we will just do the build locally. For python we can use pyinstaller. It can be run with: (assuming you're in the same folder as the python file)
pyinstaller -F links.py
This will create an executable (dist/links) which can be run
with no dependencies. All that remains is to package it in a
.tar.gz file:
tar -czf links.tar.gz -C dist links
Remembering all these steps may be a bit tedious, so here's a build script which automates this process.
#!/bin/bash
ARCHIVE_NAME=links.tar.gz
rm -rf /tmp/links-build
mkdir -p /tmp/links-build
cp links.py /tmp/links-build
pushd /tmp/links-build
pyinstaller -F links.py
tar -czf $ARCHIVE_NAME -C dist links
popd
mv /tmp/links-build/$ARCHIVE_NAME ./
Name it build.sh, put it in the same directory as links.py
and then every time you run it, it will create the archive for you.
So far we have a directory tree that looks like this:
stack-example/
  links/
    links.py
    build.sh
    links.tar.gz
Redis
Now we need to create our redis application. First we need to download the
redis source code from here: download.redis.io/releases/redis-2.8.19.tar.gz.
Create a directory we can work from, and extract it there. You should have a
redis-2.8.19 subfolder. In that folder you should be able to build the app by
running make, which creates an executable in the src
folder named redis-server. All we need to do is take that
executable and put it in another .tar.gz archive.
As before, here's a build script that will make redis for us:
#!/bin/bash
ARCHIVE_NAME=redis.tar.gz
REDIS_VERSION=2.8.19
if [ ! -f /tmp/redis-$REDIS_VERSION.tar.gz ]; then
	curl -o /tmp/redis-$REDIS_VERSION.tar.gz http://download.redis.io/releases/redis-$REDIS_VERSION.tar.gz
fi
rm -rf /tmp/redis-build
mkdir -p /tmp/redis-build
pushd /tmp/redis-build
tar -xzf /tmp/redis-$REDIS_VERSION.tar.gz
cd redis-$REDIS_VERSION
make
tar -czf /tmp/redis-build/redis.tar.gz -C /tmp/redis-build/redis-$REDIS_VERSION/src redis-server
popd
mv /tmp/redis-build/redis.tar.gz ./
That will create the archive for you. To recap here is what our directory tree looks like so far:
stack-example/
  links/
    links.py
    build.sh
    links.tar.gz
  redis/
    build.sh
    redis.tar.gz
Redis is different from our python application in 2 significant ways:
- Though it can be run directly from the command line, Redis is usually configured for your specific needs via a config file. We will come back to this topic later.
- Redis is a stateful application. Though you can certainly run it as a volatile, pure in-memory application, you probably want to store off its data somewhere so you don't lose everything on a restart. As with any database there are various ways to accomplish this (EBS volumes, periodic backups, master-slave replication, etc...) but crucially this isn't something the Badgerodon Stack does for you. For this simple example we will just ignore the issue and let a restart flush our data.
Storage
Now that we have our applications built and bundled we can move on to deployment. But before we do that, we need to decide how we want to store our releases. There are lots of options (you can find a complete list in the documentation), but for demonstration purposes we will store releases and config on Google Drive.
If you don't have a google account go ahead and make one. You will need to generate a json block of credentials for the stack application to list, retrieve and upload files. To do this run this command and follow the instructions:
stack auth gdrive
You should get a json block like this:
{
  "access_token": "...",
  "token_type": "Bearer",
  "refresh_token": "...",
  "expiry": "..."
}
You can save that block into a file (for example
$HOME/gdrive-credentials.json) and pass it to the stack
application via an environmental variable
(GOOGLE_DRIVE_CREDENTIALS_FILE). Try it now:
env GOOGLE_DRIVE_CREDENTIALS_FILE=$HOME/gdrive-credentials.json \
stack ls gdrive://
Other providers and options can be found in the project readme.
Assuming everything worked, create a machine config file that looks like this:
(in stack-example/config/machine-1.yaml)
applications:
- name: links
  source: gdrive://stack-example/releases/links/v1.tar.gz
  service:
    command: [links]
- name: redis
  source: gdrive://stack-example/releases/redis/v1.tar.gz
  service:
    command: [redis-server]
Upload the config file and the two archives to google drive in their appropriate locations. You can use the web UI for this, or you can use the stack application directly:
stack cp config/machine-1.yaml gdrive://stack-example/config/machine-1.yaml
stack cp links/links.tar.gz    gdrive://stack-example/releases/links/v1.tar.gz
stack cp redis/redis.tar.gz    gdrive://stack-example/releases/redis/v1.tar.gz
Incidentally you could also update the build scripts to copy the archives to
their final destination, using stack ls to figure out the next
version number.
Machine Setup
Now we need to setup the machine. This is done in 4 easy steps:
- Copy the credentials file you generated earlier to the server: (your
hostname/ip will probably be different)
scp $HOME/gdrive-credentials.json 192.168.56.101:/opt/gdrive-credentials.json
- Login to your server:
ssh 192.168.56.101 - Download the Badgerodon Stack application and put it somewhere on the path:
curl -L https://github.com/badgerodon/stack/releases/download/v0.3/stack-linux-amd64-v0.3.tar.gz \
| sudo tar -C /usr/bin -xz
- Record the path to your config file (for example
gdrive://stack/config/machine-1.yaml) and pass it to the stack apply command:sudo env GOOGLE_DRIVE_CREDENTIALS_FILE=/opt/gdrive-credentials.json \ stack apply gdrive://stack-example/config/machine-1.yaml
We can confirm that our applications were started by running:
ps axf | grep badgerodon-stack
You should see something like this:
14879 ?        Ss     0:00 /opt/badgerodon-stack/applications/links/links
14881 ?        S      0:00  \_ /opt/badgerodon-stack/applications/links/links
14889 ?        S      0:00      \_ /opt/badgerodon-stack/applications/links/links /opt/badgerodon-stack/applications/links/links
14890 ?        Sl     0:02          \_ /opt/badgerodon-stack/applications/links/links /opt/badgerodon-stack/applications/links/links
14883 ?        Ssl    0:01 /opt/badgerodon-stack/applications/redis/redis-server *:6379
Now we can test that our application does in fact work. POST a link to our service like this:
curl --data 'url=http://labs.bible.org/api/?passage=John+3:16' localhost:5000/links
You can use telnet to see what got stored in redis:
telnet localhost 6379
keys *
One of the keys should be a UUID (for example
45429f7c-fd70-4e70-bd11-8bed0862b2dc). Type quit to
exit telnet. GETting that UUID from our link service will
redirect you to what was stored:
curl -L localhost:5000/links/{THE_UUID_FROM_BEFORE}
And you should see:
<b>3:16</b> For this is the way God loved the world: He gave his one and only Son, so that everyone who believes in him will not perish but have eternal life.
So our service works, but we still need to setup the stack application so that
it will pick up changes automatically. For that we need to use the
watch command instead of apply, and we need to
make it so our application runs on boot (and continuously).
The way this is done depends on the init system your operating system uses. For Ubuntu that means Upstart.
Upstart
First create a config file in
/etc/init/badgerodon-stack.conf:
description "The Badgerodon Stack"

start on (started networking)
respawn

env GOOGLE_DRIVE_CREDENTIALS_FILE=/opt/gdrive-credentials.json
exec /usr/bin/stack watch gdrive://stack-example/config/machine-1.yaml
To start the application run:
initctl start badgerodon-stack
Deployment
With the Badgerodon Stack watch service running we should now be able makes changes to the config file and those changes will be picked up automatically.
Let's make it so that our redis data is saved to the hard drive. To do this we need to create a config file for Redis that tells it to sync the database to disk. There are three approaches we could take:
- We could directly embed the config file into the release itself
- We could embed several config files (perhaps for different environments or machines) and symlink the appropriate one on deploy
- We could directly embed the config file in the machine config file
The first option is pretty straightforward (just keep in mind that
applications are run with a working directory set to the contents of the
archive). The second can be done with the special links property:
applications:
- name: redis
  links:
    redis.conf: config/dev.conf
But let's go with the third option since it makes it easier for us to update
configuration without requiring a complete rebuild of the release. We use the
special files property, and the fact that YAML has good support
for embedded string blocks.
applications:
- name: links
  source: gdrive://stack-example/releases/links/v1.tar.gz
  service:
  command: [links]
- name: redis
  source: gdrive://stack-example/releases/redis/v1.tar.gz
  files:
    redis.conf: |
      bind 127.0.0.1
      port 6379
      dir /opt/
      appendonly yes
      appendfilename "redis.aof"
      appendfsync everysec
      auto-aof-rewrite-percentage 100
      auto-aof-rewrite-min-size 64mb
      aof-load-truncated yes
  service:
    command: [redis-server, redis.conf]
files maps file names to their contents, so the stack application
will create a redis.conf file when this configuration is applied.
We also modified the service command so that it uses the config file.
Consult the
Redis
documentation for the meanings of the various config statements.
Simply re-upload the config file to trigger a re-deploy. It should take about 15 seconds for the changes to be applied.
stack cp config/machine-1.yaml gdrive://stack-example/config/machine-1.yaml
User Data
Now that we have one server setup, the process for setting up additional
servers is exactly the same: just point stack watch to a
different config file (or even re-use the same config file). There is, however
an additional automation step we can take to make this easier.
When you create a virtual machine on any of the cloud providers (Amazon, Google, Digital Ocean, ...) you can specify a script to run on boot. Here's an example script which does this:
#!/bin/bash
# save the credentials
cat << EOF > /opt/gdrive-credentials.json
{
  "access_token": "...",
  "token_type": "Bearer",
  "refresh_token": "...",
  "expiry": "..."
}
EOF

# save the init script
cat << EOF > /etc/init/badgerodon-stack.conf
description "The Badgerodon Stack"

start on (started networking)
respawn

env GOOGLE_DRIVE_CREDENTIALS_FILE=/opt/gdrive-credentials.json
exec /usr/bin/stack watch gdrive://stack-example/config/machine-1.yaml
EOF

# install curl (usually installed by default, but not always)
apt-get install -y curl

# download the Badgerodon Stack application and put it in /usr/bin
curl -L https://github.com/badgerodon/stack/releases/download/v0.3/stack-linux-amd64-v0.3.tar.gz \
| tar -C /usr/bin -xz

# start it
initctl start badgerodon-stack
With this script in place we can now spin up new machines that are configured entirely by declarative yaml files. No commands are necessary and updates are as simple as merely editing a file.
Releases
The Badgerodon Stack is beta-quality software. Releases and source code are available on GitHub.